
Installation
Patronus Desktop runs as a local protection app on macOS and Windows. The first launch guides the user through the operating-system approvals Patronus needs before it can observe supported AI traffic.
Requirements
Section titled “Requirements”- macOS or Windows with permission to install local system components.
- The Patronus installer for your operating system.
- Network access during first setup.
- Admin approval when the operating system asks for it.
Install On macOS
Section titled “Install On macOS”- Download the macOS DMG from the Patronus download page.
- Open the DMG and move
Patronus.appinto/Applicationsor~/Applications. - Start
Patronus.app. - Follow the setup screen in Patronus.
- Approve the macOS prompts shown during setup.
- Start protection from Patronus Desktop.
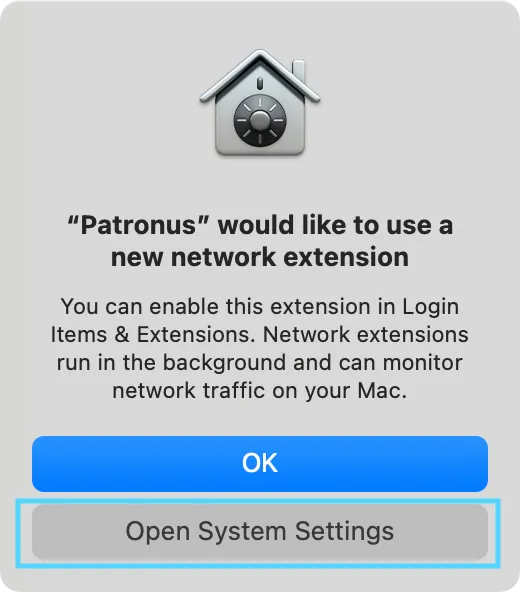
If macOS asks for Network Extension approval, approve Patronus in System Settings and return to Patronus Desktop.
Install On Windows
Section titled “Install On Windows”- Download the Windows installer from the Patronus download page.
- Run the installer and approve the Windows elevation prompt.
- Complete the installer. If Windows needs an additional Microsoft WebView component, the installer will guide you through it.
- Start Patronus Desktop from the Start Menu.
- Follow the setup screen in Patronus.
- Start protection from Patronus Desktop.
If Windows requires additional security approval, complete the prompt and return to Patronus Desktop.
Onboarding
Section titled “Onboarding”The first launch runs Patronus onboarding. Onboarding checks whether the local protection components are present, repairs missing pieces, and asks the operating system for the approvals Patronus needs.
macOS Onboarding
Section titled “macOS Onboarding”On macOS, onboarding covers:
- Installing or updating the privileged helper.
- Generating the local
mitmproxycertificate authority if it does not exist yet. - Trusting the
mitmproxyCA in the system trust store. - Configuring runtime CA environment values for supported CLI and SDK runtimes.
- Asking macOS to approve the Patronus Network Extension and proxy configuration.
- Starting protection after the approvals are complete.
If any step is missing later, Patronus shows a repair state and reruns the relevant onboarding action.
Windows Onboarding
Section titled “Windows Onboarding”On Windows, onboarding covers:
- Installing or updating the Patronus helper service.
- Generating the local
mitmproxycertificate authority if it does not exist yet. - Trusting the
mitmproxyCA in the Windows trusted root store. - Configuring runtime CA environment values for supported CLI and SDK runtimes.
- Preparing the Windows traffic capture path used by Patronus.
- Starting protection after the required approvals are complete.
If Windows asks for elevation or security approval, complete the prompt and return to Patronus Desktop.
Approve The Network Extension (macOS)
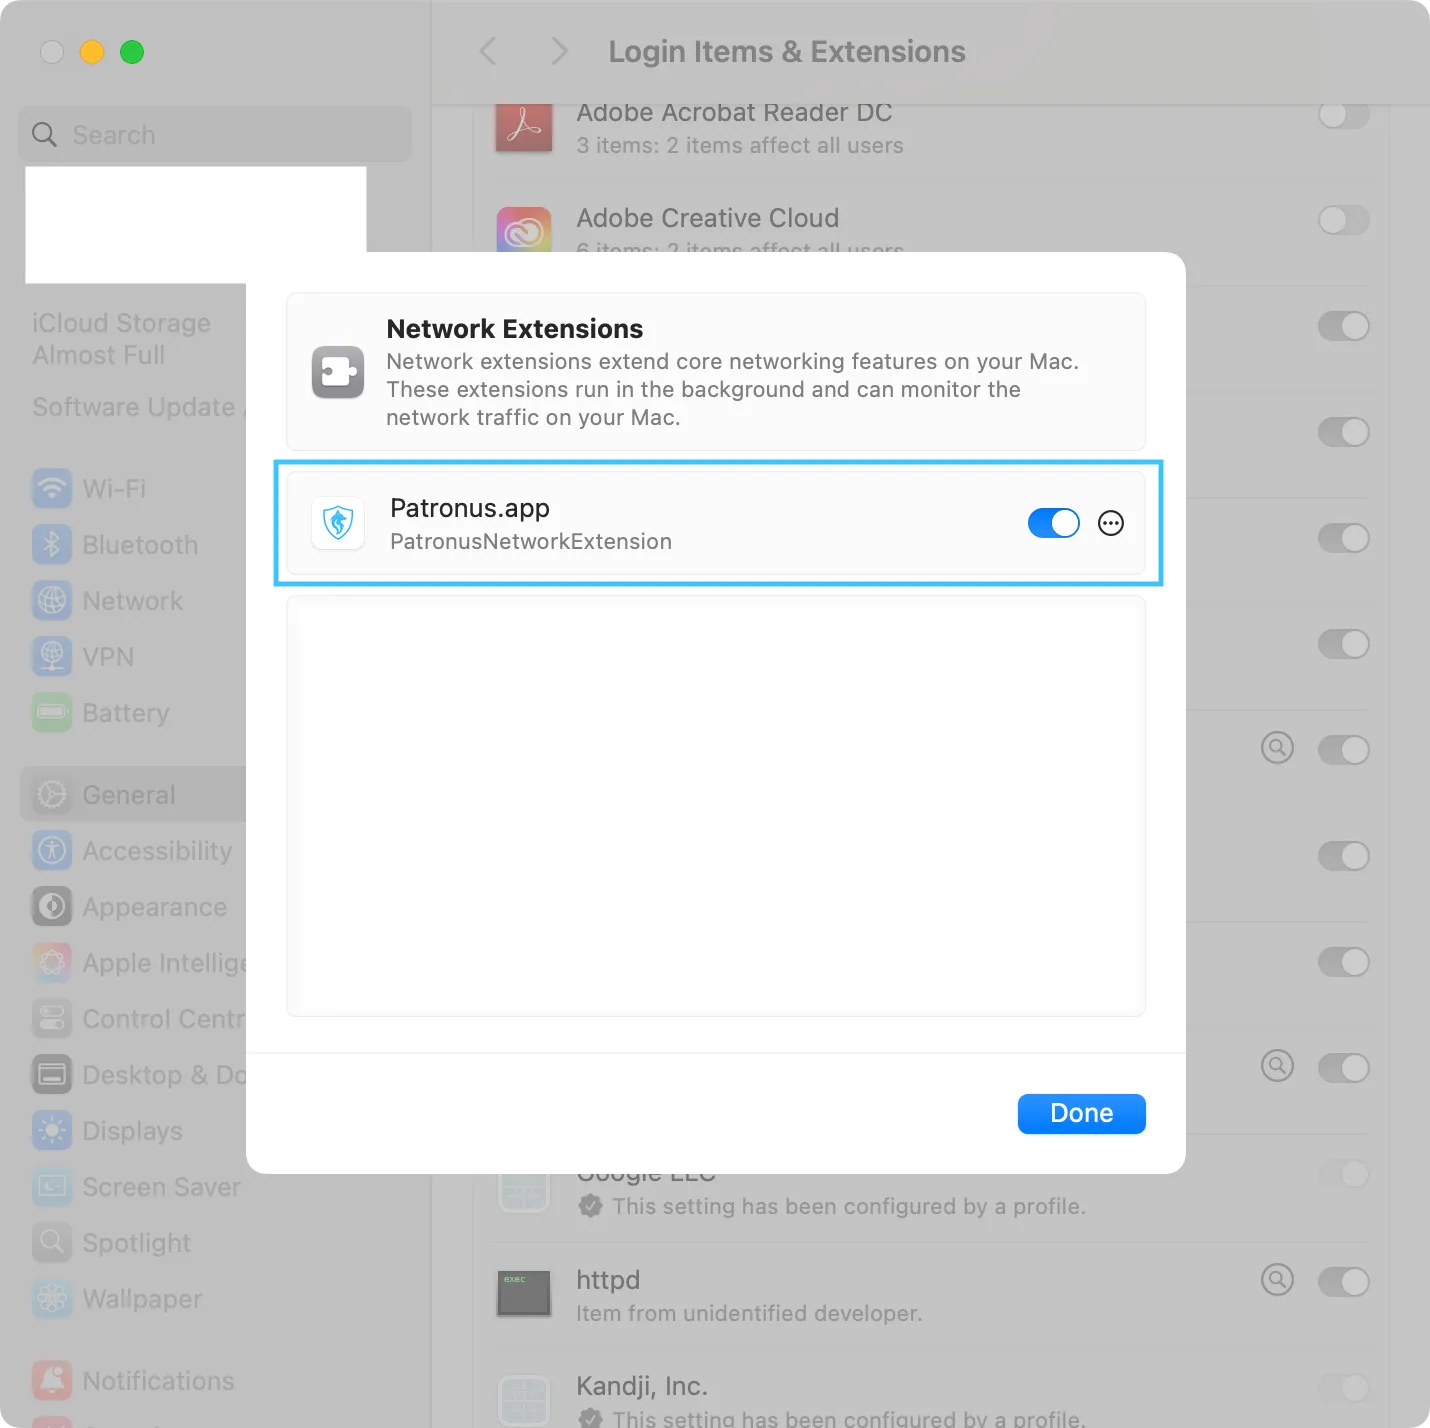
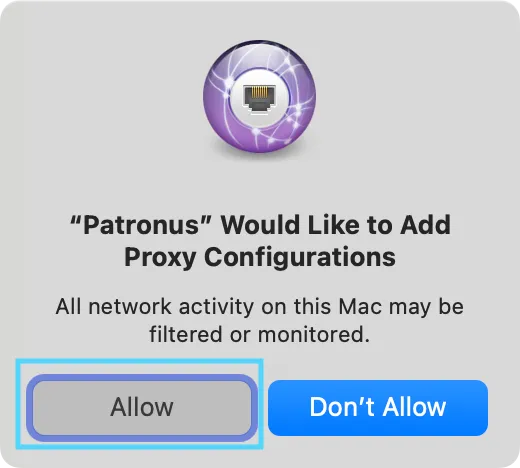
Section titled “Approve The Network Extension (macOS)”Patronus uses a system Network Extension to observe AI traffic on macOS. The first time you start protection, macOS asks you to allow the extension. Patronus Desktop guides you through it; the steps below mirror what you will see.
1. Open System Settings → Network → Filters
Section titled “1. Open System Settings → Network → Filters”When Patronus prompts you, open System Settings. Patronus appears in Network → Filters as a pending content filter.
2. Allow proxy changes
Section titled “2. Allow proxy changes”macOS asks you to allow Patronus to add a proxy configuration. Approve the prompt with Touch ID or your password.
3. Confirm the extension
Section titled “3. Confirm the extension”Confirm that the Patronus filter is listed and enabled. Return to Patronus Desktop and continue.
If macOS does not show a prompt, open System Settings → Network → Filters manually and enable Patronus there.
Trust The Local Certificate Authority
Section titled “Trust The Local Certificate Authority”Patronus inspects encrypted AI traffic through a local certificate authority (CA) that lives only on your device. Without a trusted CA, Patronus could not see whether an outgoing request contains a prompt injection, leaked secret, or other risk.
- During setup Patronus installs the CA into the system trust store automatically through its privileged helper. You do not need to do anything for a normal install.
- On macOS you can verify it by opening Keychain Access → System and looking for a
mitmproxycertificate marked as trusted. - On Windows the CA lives under Certificate Manager → Trusted Root Certification Authorities.
- The CA only signs traffic for AI hosts Patronus is configured to inspect. It is not a wildcard MITM for the whole device.
If the CA is missing or marked as untrusted, re-run the setup step from Patronus Desktop. Patronus will reinstall the CA through the privileged helper rather than asking you to handle certificates manually.
Restart Shells And Terminal Sessions
Section titled “Restart Shells And Terminal Sessions”After protection starts for the first time, open new terminal sessions before running CLI tools that talk to AI services. Tools that read proxy or certificate settings only at process start will otherwise keep using the unprotected configuration from the old session.
This typically affects:
nodeand JavaScript runtimes (npm, yarn, pnpm scripts that hit AI APIs).python,pip, anduv-based clients (OpenAI SDK, Anthropic SDK, LangChain).gitwhen configured to talk to AI-assisted code review services.dockeranddocker composewhen builds or containers reach out to AI hosts.- Long-running editors (IDE shells, tmux panes) — restart the embedded terminal, not the editor itself.
If a CLI keeps connecting without going through Patronus, close the terminal window and open a fresh one. You do not need to log out of the device.
What Gets Installed
Section titled “What Gets Installed”Patronus keeps everything on your device. A standard install places the following on the system:
- The Patronus application (
Patronus.appon macOS,Patronus.exeon Windows) in the standard application location. - A privileged helper used to configure the system proxy, install the local CA, and start the macOS Network Extension. The helper has no network access of its own.
- A local certificate authority added to the system trust store so encrypted AI traffic can be inspected.
- A local configuration file in the per-user data directory. It stores your policy, preferences, and the local activity database. Patronus never uploads this file.
- Optional local AI detection models downloaded on demand. Patronus uses them for on-device prompt-injection, secret, and PII detection so request contents never have to leave the device. Models are fetched the first time a policy needs them and cached locally.
Patronus does not install browser extensions, system-wide hooks, or background services beyond what is listed above.
Verify Protection
Section titled “Verify Protection”After setup:
- Open Patronus from the tray.
- Confirm Patronus shows protection as running.
- Send a simple request through a supported AI app, CLI, SDK, or local model endpoint.
- Open the activity or audit view and check that the request appears.
Update And Repair
Section titled “Update And Repair”Patronus may show one of these visible update or recovery states:
- Update available means a new Patronus version can be installed.
- Repair required means Patronus needs to restore a local component before protection can start.
- Restart required means the operating system or Patronus needs a restart before protection continues.
Follow the action shown in Patronus Desktop. If protection does not start after the action, restart Patronus and try again.
Uninstall
Section titled “Uninstall”Use the standard uninstall flow for your operating system:
- On macOS, use the Patronus uninstaller if one is included with your installation package.
- On Windows, uninstall Patronus from Windows Settings or the Start Menu entry provided by the installer.
The uninstaller removes the local proxy state, trusted mitmproxy CA entries, runtime CA environment values, helper services, and Patronus runtime files. If uninstall is interrupted or a local test leaves proxy or CA state behind, use the commands in Uninstall And Manual Cleanup.
After uninstalling, restart the device if the operating system asks for it.